Last updated on June 15th, 2025
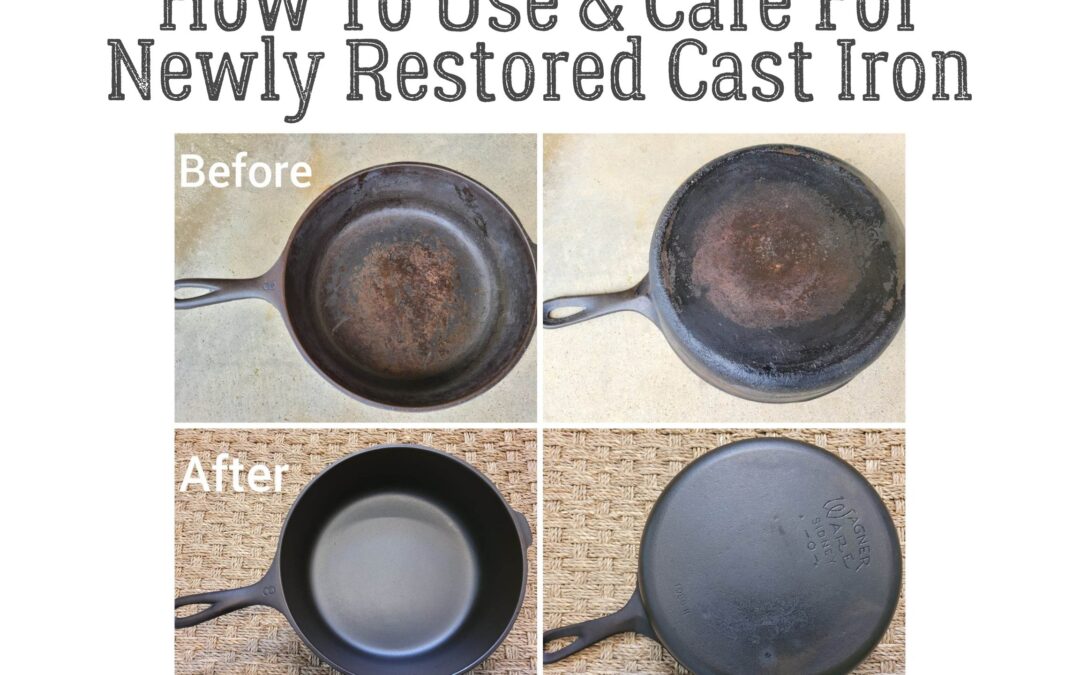
Your cast iron cookware has just been freshly restored and looks so much better – that’s great! So now what? You might find yourself feeling a little nervous about using or washing your newly restored cast iron because you don’t want to “mess it up.” Don’t worry, you’re not alone! I’ve had several people contact me about the best way to use and care for their restored cast iron, so I’ve written this article as a helpful guide.
What’s Different About Newly Restored Cast Iron?
I like to think of restoration as a “factory reset” for your cast iron cookware. The old seasoning, rust, and carbon buildup are stripped away, then a new base layer of seasoning is applied in the oven. After restoration, your cast iron looks good and is ready to start using.
So what’s different about a newly restored cast iron pan? Here are a few important things you should know about using and caring for restored cast iron cookware:
The Seasoning Layer Is New and Somewhat Fragile
Seasoning that is “manually” applied by oiling and baking the pan in an oven is a starting point that serves two main functions: 1) To protect the cast iron from rust, and 2) to form a barrier between the iron pan and your food. It is relatively thin and can be damaged more easily than a pan that’s been regularly used for months or years. The good news is that the seasoning layer becomes thicker, darker, and more durable over time with consistent use.
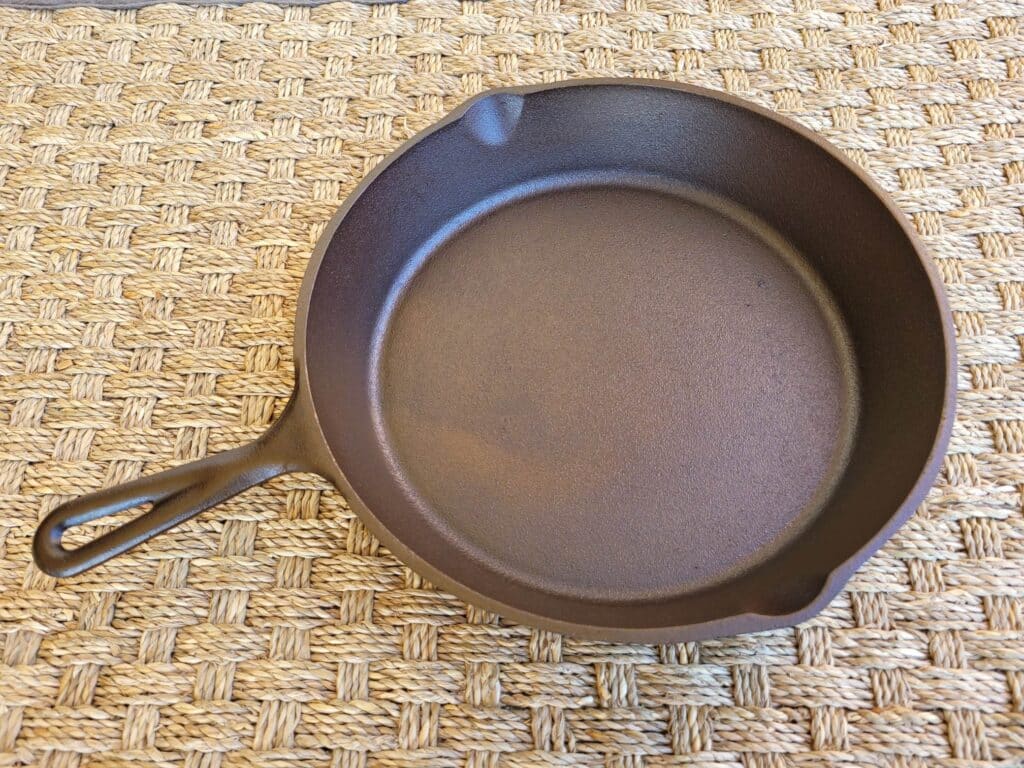
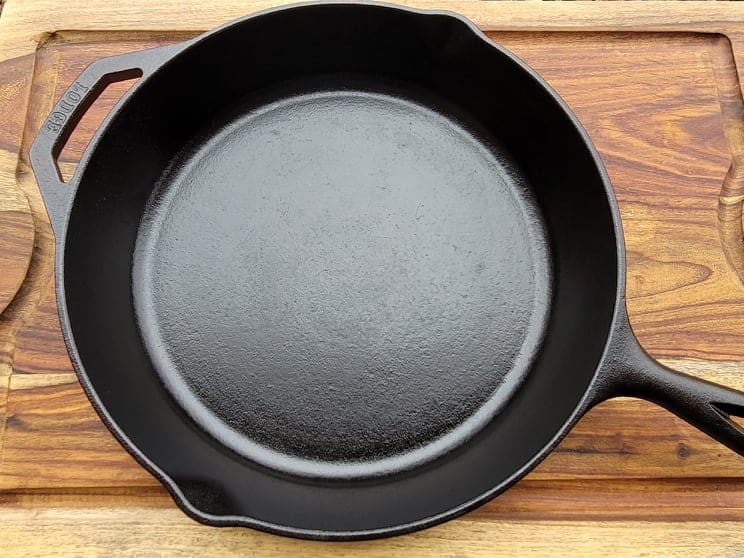
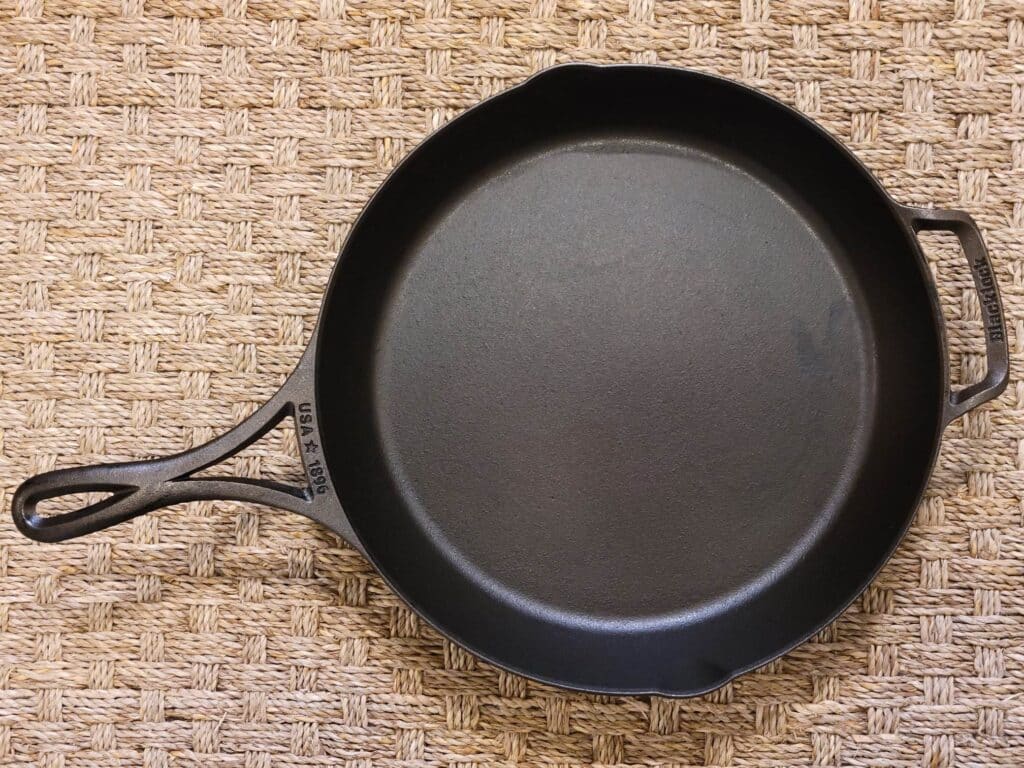
A Bronze Color Is Normal
A newly seasoned piece of cast iron cookware may appear bronze in color at first, which is completely normal. The color of a recently restored cast iron pan also has a lot to do with the color of the bare iron underneath after being stripped (some iron is lighter, some is darker), and the type of oil used to season it. Grapeseed oil tends to produce a more bronze-tinted seasoning layer initially.
Over time, as the pan is exposed to heat, oils, and fats while cooking, it darkens. You can see the difference in these two photos:
Cast Iron Seasoning Is Always Changing
Every time you cook in your cast iron pan, you will lose a little bit of seasoning and gain a little bit of seasoning. Your pan may look patchy or discolored in areas. This will continue to happen for weeks or months and will improve the more frequently you use it.
I’ve found that patchy seasoning is more noticeable on rough-textured cast iron versus smooth. But don’t let it worry you – it’s completely normal! Keep cooking with plenty of fats and oils (butter, bacon grease, lard, tallow, Crisco, oils, PAM spray), and the surface of your pan will start to look more uniform in texture and color.
A newly restored cast iron skillet. Seasoning is uniform in appearance.
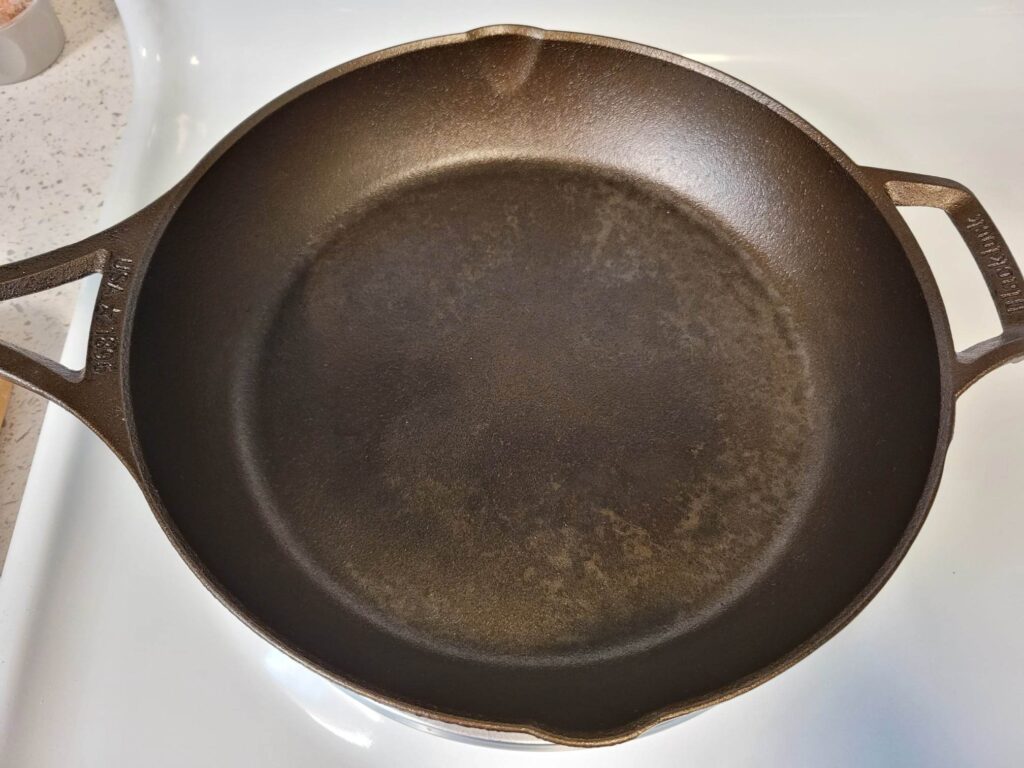
The same newly restored skillet after cooking and washing it a few times. Seasoning looks a little patchy and discolored.
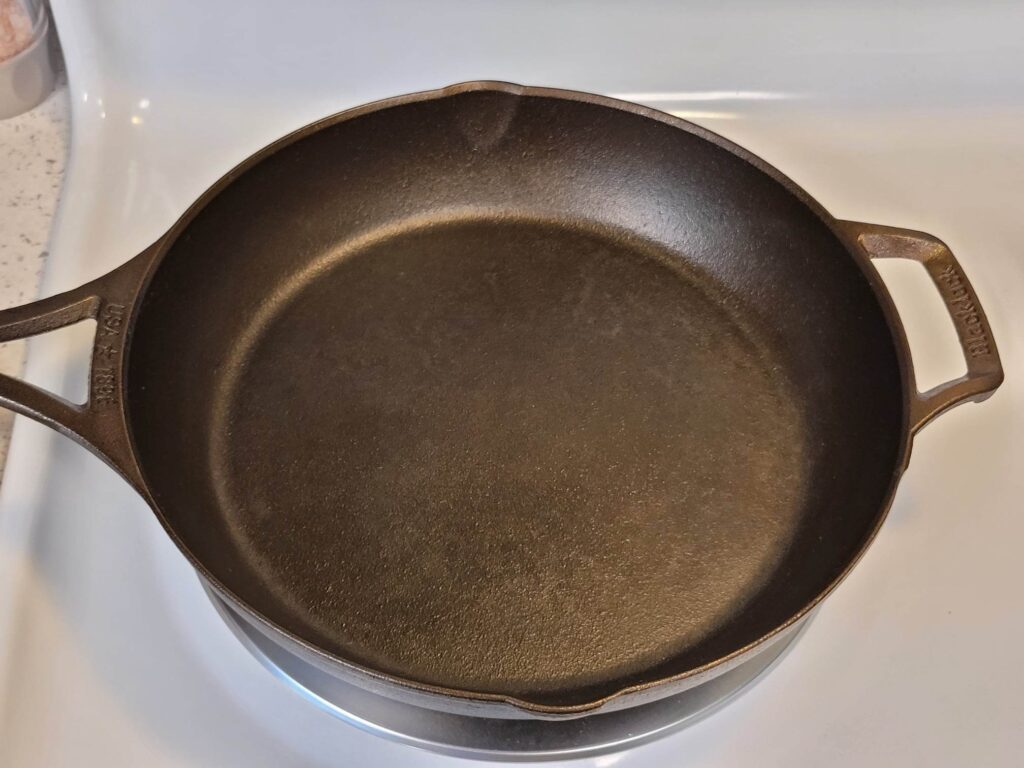
The same skillet after cooking with it for a month. Note the seasoning becoming darker and more uniform.
Newly Seasoned Cast Iron Is NOT Automatically Non-Stick
Many people have the misconception that their cast iron cookware will have a non-stick surface immediately after restoration. Oh, how I wish this was possible! But, it’s not. In fact, whether or not any cast iron pan, newly restored or not, releases food easily really depends on two factors: Heat control and using an adequate amount of cooking fat. I’ll go into more detail on this topic below.
How To Build Cast Iron Seasoning
The first key to building a strong seasoning layer in your cast iron pan is understanding that it takes time and consistent cooking.
Previous generations didn’t have fancy non-stick aluminum cookware or a special pan for every type of food. They cooked nearly everything with a cast iron skillet or deep pot. This meant that the skillet was used for breakfast, lunch, and dinner. It probably barely had time to cool down on the stove before being used again. People used lard, tallow, bacon grease, and butter to cook their food. Every time that skillet was used for frying, sauteing, or cooking meats, bacon, and eggs, some of the fats and oils bonded with the pan, thus, reinforcing the seasoning.
The best way to build up your cast iron pan’s seasoning is to do the same thing: Cook frequently with plenty of fats and oils. Pan-frying bacon and meats, deep frying chicken or fries, or cooking cornbread in the oven are great ways to break in your newly restored pan and start adding to its seasoning layer.
It’s also important to clean your cast iron properly. I’ll go into more detail on this topic below, but in short, don’t soak your pan or boil water in it to remove stuck food. Avoid vigorous scrubbing, and simply wipe out your skillet or use water to gently wash it out. If you choose to use soap (which is also fine!), opt for a small amount of diluted, unscented castile soap or mild dish soap.
A Word About Cast Iron Lids
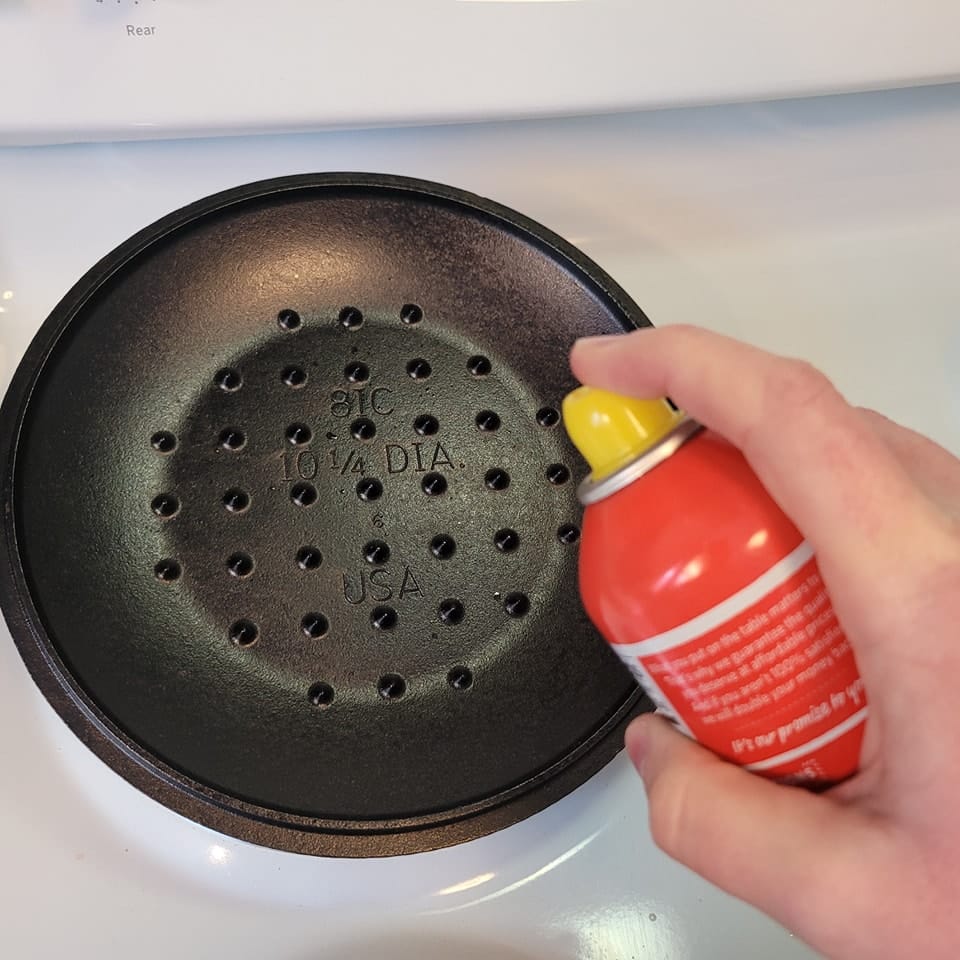
Cast iron lids tend to take a beating from steam. The best way to avoid rust is to spray the underside of the lid with cooking spray (like PAM) and lightly blot up the excess before use. Don’t be alarmed if you see some discoloration after using the lid. After use, simply wipe it totally dry with paper towels, apply another light coat of oil, and wipe completely dry again to avoid stickiness.
Cast iron lids work best for frying, oil-based cooking, or baking bread in a dutch oven. If you’re planning to use a lid for tasks like steaming or boiling on the stovetop, you may want to opt for a glass lid. I have glass lids from other cooking sets that fit my cast iron skillets and dutch ovens perfectly. If you don’t have a glass lid, you can purchase one from Lodge Cast Iron or pick one up from a local thrift shop for cheap.
How To Cook Successfully With Newly Restored Cast Iron
Now that you know the differences between a well-used cast iron pan with a strong seasoning layer and a newly restored one, here are the best ways to have a successful cast iron cooking experience:
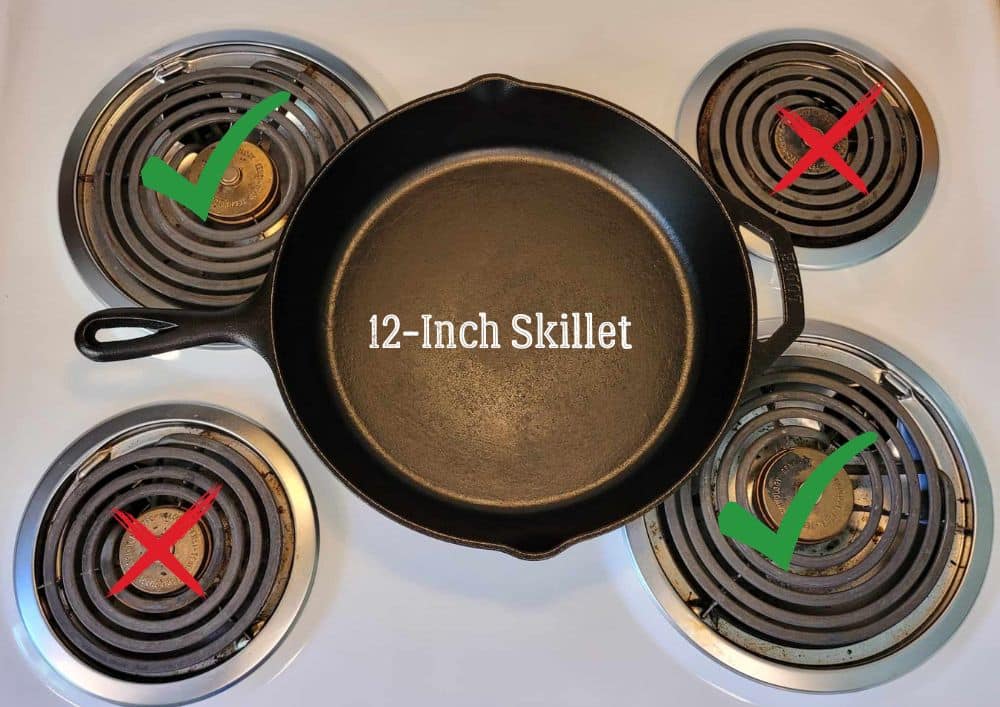
Match The Pan and Burner Sizes
For the best cooking results, choose a stovetop burner that’s close to the same size pan you’re using. You’ll get more even heat and avoid concentrated hot spots in the center of your skillet. Intense heat in one section of the pan can cause darkening in that area, actually burn off your seasoning, and make food stick. This is especially important with gas stoves.
Preheat The Pan Slowly
You’ll want to preheat your cast iron pan before cooking eggs, searing meats, and sauteing foods on the stovetop or cooking cornbread in the oven.
On the stovetop, put your pan on a burner and turn it to medium-low heat (around burner setting 3 or 4). Let the pan heat for about 4 or 5 minutes before adding your cooking fat, eggs, or meat.
For cornbread, place the pan in a cold oven. Set the oven to your desired baking temperature and let the cast iron pan and the oven preheat together. Once preheated, carefully remove the pan from the oven and add your oil and cornbread batter. Return the pan to the oven and bake the cornbread as directed.
For more information about when and how to preheat cast iron, check out this article.
Cook With Plenty Of Fats and Oils
Cast iron cooking isn’t designed to be low-fat, since fats and oils are what protect the iron and build your pan’s seasoning layer.
Make sure to use enough cooking oil, lard, tallow, bacon grease, butter, ghee, or whatever fat you like to cook with to thinly cover the bottom of the pan before adding your food. It is okay to use cooking sprays, such as PAM, on cast iron. I recommend the original PAM made from canola oil instead of the olive oil version. Olive oil has a lower smoke point, and it smokes and burns more easily.
Note that while cooking with PAM spray is fine, don’t try to season your cast iron pan with it. The additives and impurities will result in a sticky, patchy seasoning layer that won’t perform well.
Control The Heat When Cooking
Proper heat control on a stovetop burner is key for minimizing stuck food and protecting new seasoning. There’s a saying that goes, “When cooking with cast iron, medium is high, and low is medium.” This means the stovetop burner setting “5,” which would be considered medium heat with a stainless steel or aluminum pan, is equivalent to the highest setting of “10” with a cast iron pan.
Even if you want to sear a steak, there’s no need to turn your burner above the medium setting. Let the pan preheat for 3 to 5 minutes and it will be HOT, HOT, HOT. Cast iron heats slowly, but holds heat well and continues to get hotter and hotter as you cook. Keep an eye on the temperature and turn down the burner heat as you cook. You’ll avoid burning your food and accidentally scorching the seasoning off your newly restored pan.
Initially Avoid Acidic and High Water Content Foods
For the first few months of use, it’s best to avoid cooking acidic foods like tomato and wine-based dishes, and high water content foods like beans or broth-based soups. Don’t boil water or attempt to deglaze in a newly restored cast iron pan.
For more about cooking soups, stews, and boiling water in cast iron, see this article.
Restored Cast Iron Cleaning and Care
After cooking, let the pan cool off until it is still warm but safe to handle.
If there is very little residue in the pan after cooking, simply wipe the pan out with a paper towel. I do this after cooking pancakes, toasting bread or making grilled cheese, or sometimes even after frying an egg. I just wipe the pan out really well to remove food residue, crumbs, and excess oil. The little bit of oil remaining on the iron conditions it and protects the pan from rust.
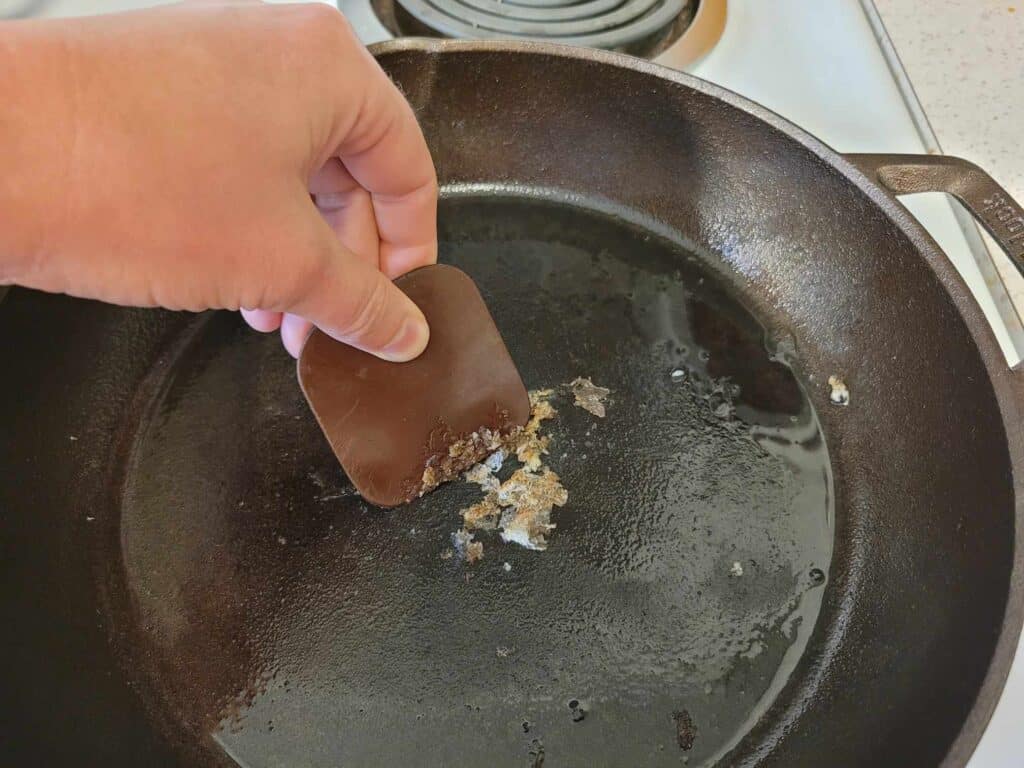
If your pan has some stuck-on food residue, it’s best to use a wooden spatula or plastic scraper to remove it. You can also do this in the sink with lukewarm, running water. I have these scrapers and love them. They don’t damage the seasoning and do a great job of removing stuck food bits.
Alternatively, you can pour some coarse salt into the pan and scrub it around a little bit with a paper towel.

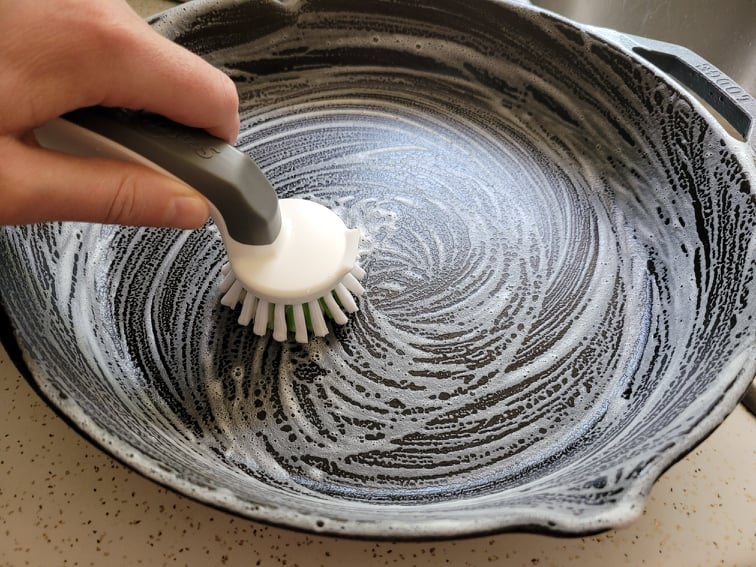
Then, gently wash the pan in lukewarm water with a dish brush or sponge. Make sure to wash off any oil that spills over onto the outside of the pan. I love the Scrub Daddy sponges because they’re tough enough to clean the pan, but they don’t scratch the seasoning. I also usually use just a couple of drops of unscented castile soap to help remove food residue and odors. Castile soap is made from plant oils and is much gentler on newly seasoned cast iron than regular dish soap.
If you’re concerned about the cleanliness of a cast iron pan without using soap, definitely check out this article: “Are Cast Iron Pans Sanitary? The Science Behind The Answer.” You might be surprised at the answer!
On the other hand, if you’re curious about using soap on cast iron but you’re not quite convinced yet, read this article: “How To Safely Wash Cast Iron With Soap + Best Soaps To Use” and see what Lodge Cast Iron has to say about cleaning pans with soap.
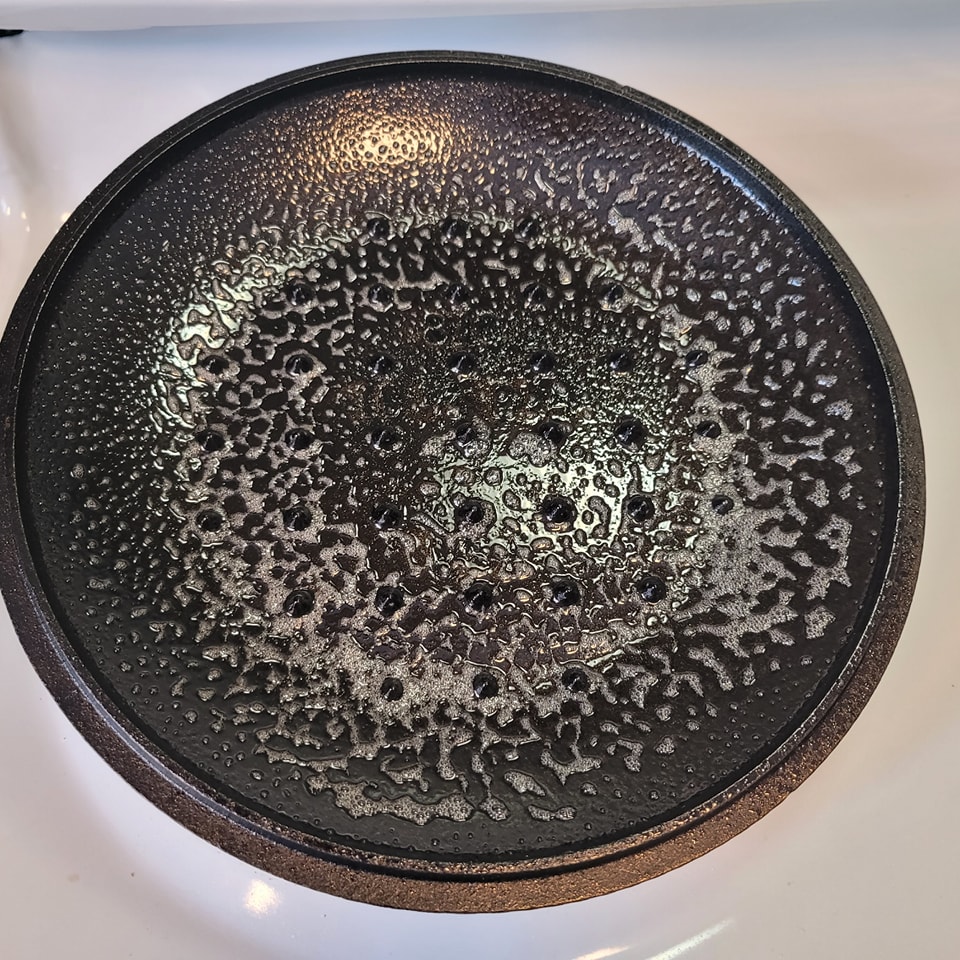
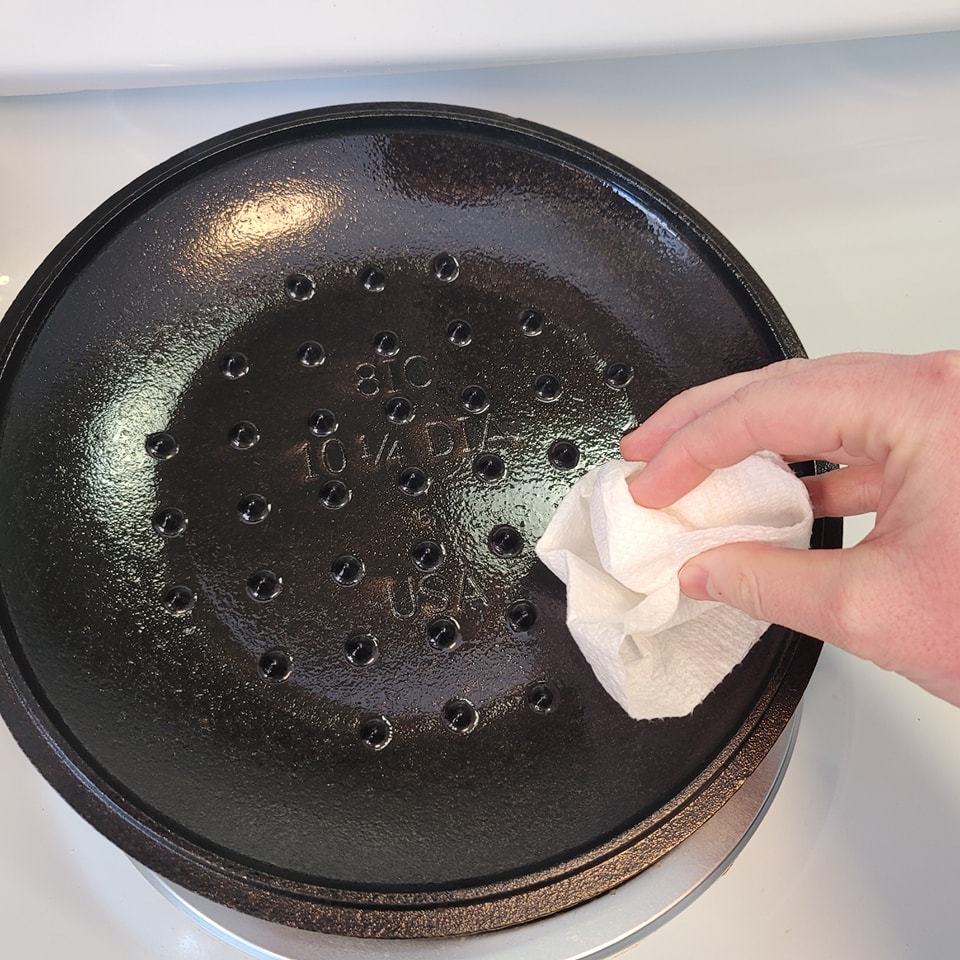
After washing, dry your pan immediately with a towel. You may notice a bit of greyish carbon residue on the towel from the iron. That’s normal at first and is not harmful in any way. Your pan might also look a little dry or discolored on the cooking surface. Again, totally normal. Simply apply a small amount of cooking oil or seasoning wax all over the inside of the pan, then wipe it off really well with a paper towel or blue shop towel. Your pan will be conditioned and ready to use.
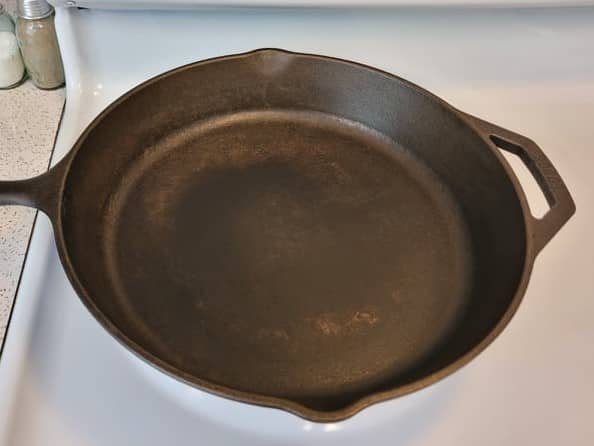
Skillet surface appears dull / discolored after washing and drying
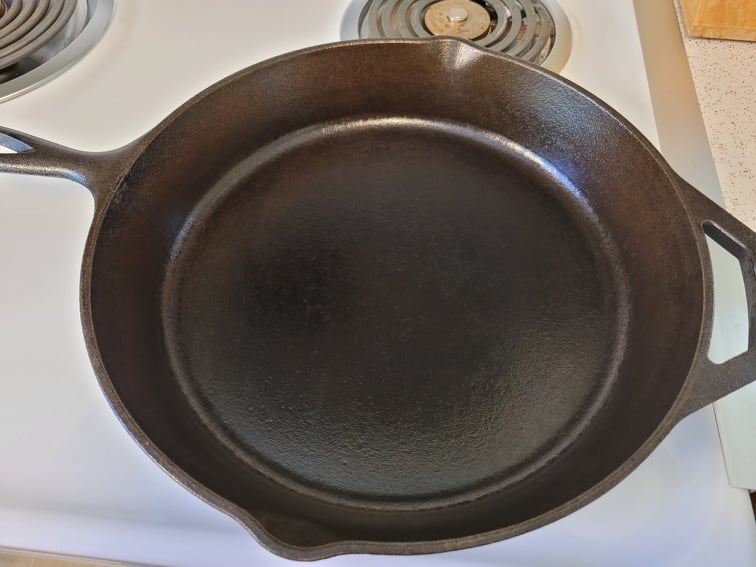
Conditioned skillet surface after applying oil and wiping it off
Summary
Don’t let using your newly restored cast iron cookware feel intimidating. Just follow these simple guidelines: Preheat, add oil, control the heat, and clean your pan properly.
Now, let’s start cooking!
This post may contain affiliate links. This means if you click on a link and make a purchase, I will receive a small commission, at no cost to you, that makes it possible for me to keep the Campfires and Cast Iron site up and running. Please see our disclosure policy for details.